Northern Jungle and Water Access are useful names for getting your bearings on Gateway, but neither name is a complete travel instruction. Start by finding your own position, distinguish the two references on the map and choose a short next leg that you can check in-game. That is more useful than following “head towards the water” through unfamiliar trees.
Confirm your current position, your intended destination and one recognisable checkpoint between them. A region label identifies an area; it does not identify the nearest drinkable bank or guarantee a clear route.
Region names checked against the current TheIsleMinimap location layer on 8 November 2026. The cover is an AI-generated conceptual illustration of jungle and water, not a screenshot or an exact route map.
Northern Jungle, Northern Beach and Water Access are different references
The app's location layer includes all three names. It also includes North Plains, North Lake and Northwest Ridge. Similar wording is not enough to establish that someone is describing the same place as you. Say the complete label when agreeing on a destination.
| Reference | How to use it | What not to assume |
|---|---|---|
| Northern Jungle | Identify the broad region you are discussing, then choose a smaller visible reference. | Every stretch of trees in the north is the same meeting place. |
| Water Access | Locate this named region separately and inspect your approach to it. | Its label is an exact drinking point or a safety guarantee. |
| Northern Beach | Distinguish the coastal reference from an inland jungle destination. | Reaching the coast solves a freshwater need. |
These labels help describe a journey; they are not drawn administrative borders. When your position lies between names, use a nearby road bend, shoreline shape or other visible feature to make the description more precise.
Locate yourself before choosing a direction
- Capture your current position. Copy Asset Location in The Isle or use your configured screen reader while its coordinates are visible.
- Open location names. In TheIsleMinimap, go to Settings > Map Layers > General and enable Location names.
- Zoom out for context. Find the relevant region names and your marker in the same wider view.
- Zoom back in to inspect the next leg. Compare the terrain with what you can actually see from your dinosaur.
Do not choose a compass direction from a marker you captured several minutes ago. Check the last position information first. If the marker is stale, a correct map can still give you an incorrect starting point for the journey you are planning.
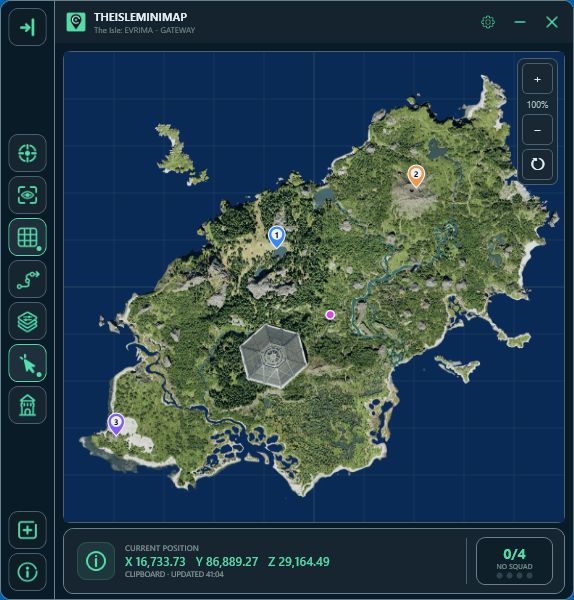
The coordinates guide explains position updates. The map layers page shows the available references if you are still deciding which ones to display.
Plan one leg between Northern Jungle and Water Access at a time
Find both labels before committing to travel between them. Then ask which visible feature you can reach next without guessing about terrain hidden by the top-down view. A short checkpoint might be a bend you can identify, a junction or a distinctive edge of open ground.
Do not treat a straight line between the two names as a walkable path. Slopes, banks and vegetation can change what is practical for your dinosaur. If your next leg requires a crossing, inspect the entry and the intended exit before starting it. You need a way to finish the leg, not just a place to enter.
Keep the route description small enough to remember while playing: start reference, next checkpoint, fallback direction. Once you reach the checkpoint, update your position and choose the following leg. This avoids trying to memorise several uncertain turns through similar-looking vegetation.
If the route you expected does not match the ground, stop and reassess. The game's official 0.20.109 release notes are one example of Gateway terrain, trails and water locations changing over time. They are not a current route description for these two regions. Use visible terrain to check any map or older video.
Water Access: check the bank, not just the name
Decide whether you need a drink, a crossing or simply a location reference. Those are different tasks. A suitable place to pause near water is not automatically a suitable crossing, and a crossing you can complete is not automatically a comfortable place to linger.
Before approaching a bank, look at the ground you will return to. Avoid reducing your choices to an awkward climb or a blind turn. Check the surroundings before you are urgently thirsty so that taking a different approach remains possible.
Freshwater planning deserves its own decision. Do not continue to a coastal label merely because you can see a large blue area on the map. For the general drinking and approach routine, use the water guide; for beach orientation, use the coastal guide.
Make a meeting point more precise than “near Water Access”
Agree on the full region name first, then the side of a recognisable feature and the final approach. If you cannot describe which bank or which bend you mean, choose a clearer meeting reference before everyone starts moving.
With Squad sharing, a destination pin can make the intended point easier to compare. Your friends' markers show their latest shared position updates, so have each person capture coordinates again before making a long detour towards them. The private squads guide explains sharing; the map does not reveal nearby strangers.
For Solo navigation, a personal pin can mark your proposed next checkpoint. Keep it distinct from a resource claim: placing a pin does not confirm that food, a patrol assignment or a safe resting place exists there. Remove or move it when your plan changes.
Three mistakes that make this trip confusing
- Using the scenery as the whole address. “Jungle beside water” can describe many places. Combine a named region with one smaller reference.
- Following a line instead of the ground. Map lines and a movement trail do not prove that the space between two points is passable.
- Replanning only when resources run low. Check your condition at each checkpoint so an alternative remains a choice.
When you lose confidence in the route, return to the last reference you can positively identify in the map and the game. Repeating an uncertain direction more quickly usually makes the next comparison harder.
Northern Jungle and Water Access questions
Does Water Access mark one exact drinking spot?
No. Treat it as a named region and inspect the actual bank and water in-game.
Are the map's animal references live nearby creatures?
No. They do not establish that an animal is present beside you or that a resource is currently available.
Is there a guaranteed safe route between these regions?
This guide does not claim one. It gives an orientation method you can check against your current position, terrain and surroundings.